Hello, my name is Gabriel from Gallup, USA. In this video, I'll teach you how to reset this device, the Linksys adapter, if you are having trouble resetting it because the solutions you find on the internet don't work. I'll teach you some tricks. One of them can be found on the Cisco website, where it says you have to lift up the phone on the device and then press the start button four times. After that, you have to dial 73 73 8 followed by the pound key. Once you have done that, press the number one, and you should be able to reset it. If you have a problem with picking up the phone and not hearing anything, it means the device is not working properly. The solution for this is to connect the phone to the port labeled "phone," the computer to the port labeled "after net," and the internet connection to the port labeled "internet." The black core should be used to power up the device. Now, what you have to do is pick up the phone. If the device is working, you will dial the numbers I mentioned earlier, and it should work. If it doesn't work, as mentioned before, you can try leaving it disconnected for a while until you hear the sound of an "alarm of cuca." Once you hear that sound, you have to dial all the numbers I mentioned earlier, and it should work just fine. If you have found this video helpful and would like to contribute, collaboration or donation would be greatly appreciated. I will provide the email of my PayPal account in the description below. Please let me know in the comment section below if it works for you. See you next time, bye.
Award-winning PDF software


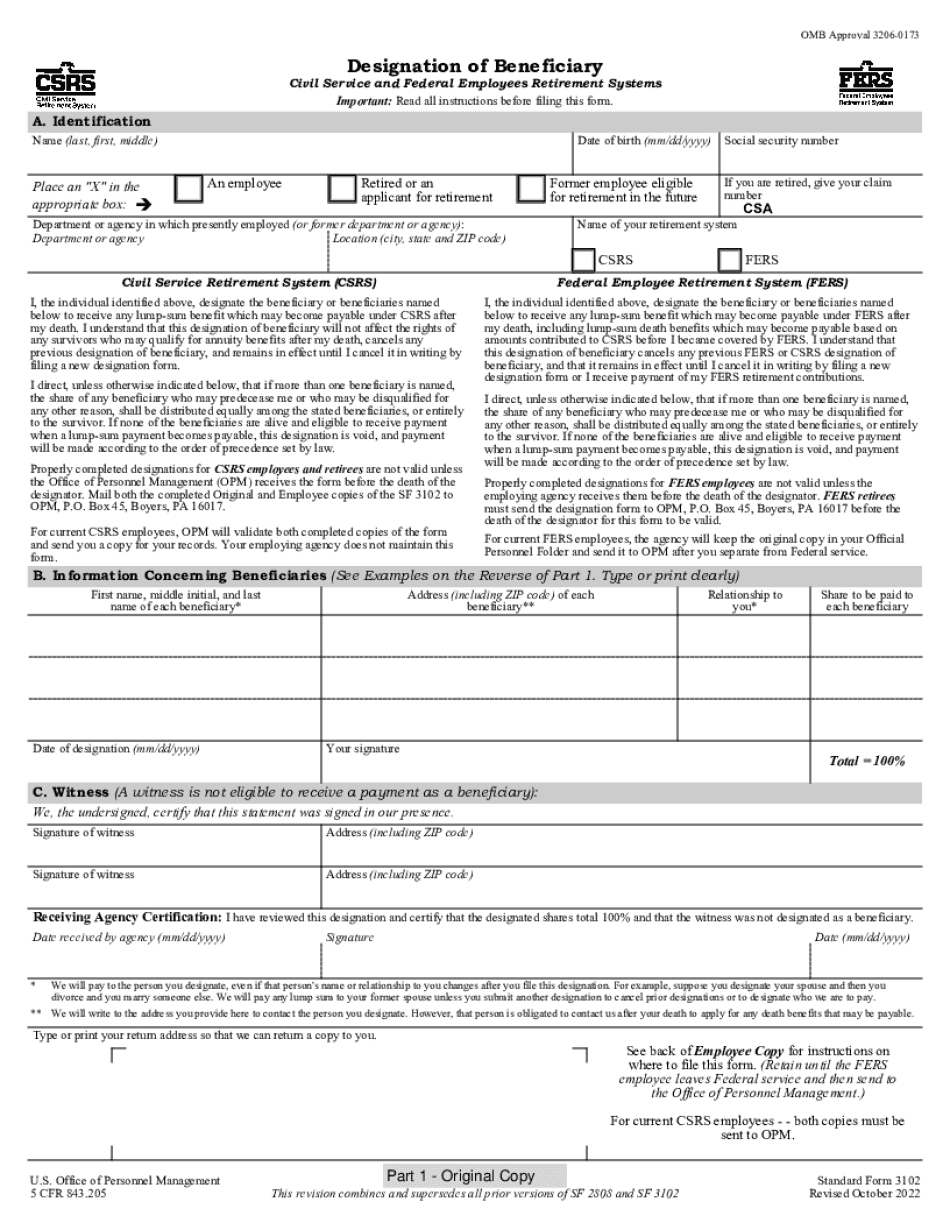
Sf 3102 Form: What You Should Know
B: All Designation of Beneficiary Forms are in PDF format and can be opened in Adobe PDF reader with no need to convert to MS Word. (PDF version not available unless you have the Adobe Acrobat Reader installed) SF-3102 The Designation of Beneficiary Form will contain information such as the beneficiary's Social Security Number, name, and the beneficiary's employer. The beneficiary may also sign as the designated beneficiary if the designee is available. An individual should receive a designee form at the time of nomination. An individual cannot designate a child under 18 to appear as the designated beneficiary. C: (1) Each Designation of Beneficiary forms is to be signed under penalty of perjury by the person designated as the designated beneficiary or the designee if available. An individual registering in person may also sign the Form if the designee or designee is not available. (2) The form must be signed within six months of the date of the appointment when the appointment was signed, or within six months from the date that the person designated to be the designated beneficiary began receiving pay, whichever occurs later. (3) If an individual is registering more than once in person, (i) The form must be signed by the applicant at any of their appointments in person. If the application was received by mail, it will be returned to the applicant or the person designated, whichever is applicable. If the application was received by mail and the applicant signs in person, a new Designation of Beneficiary form must be completed and an additional signature attested to by a notary public attesting to the accuracy of the information on the application. This new form must be signed and completed within a one-year period after that date of appointment. (ii) An individual will have the right to sign each form at the time of its issuance. The Designation of Beneficiary form must be signed within six months after a person signs the SF-3102. (4) It is a Class 1 misdemeanor to knowingly sign a Form as designated. If the Form is signed by a person not lawfully entitled to do so, the violation may be punished by a fine no greater than 10 percent of the designated amount of pay.
Online solutions help you to manage your record administration along with raise the efficiency of the workflows. Stick to the fast guide to do Sf 3102, steer clear of blunders along with furnish it in a timely manner:
How to complete any Sf 3102 online: - On the site with all the document, click on Begin immediately along with complete for the editor.
- Use your indications to submit established track record areas.
- Add your own info and speak to data.
- Make sure that you enter correct details and numbers throughout suitable areas.
- Very carefully confirm the content of the form as well as grammar along with punctuational.
- Navigate to Support area when you have questions or perhaps handle our assistance team.
- Place an electronic digital unique in your Sf 3102 by using Sign Device.
- After the form is fully gone, media Completed.
- Deliver the particular prepared document by way of electronic mail or facsimile, art print it out or perhaps reduce the gadget.
PDF editor permits you to help make changes to your Sf 3102 from the internet connected gadget, personalize it based on your requirements, indicator this in electronic format and also disperse differently.
Video instructions and help with filling out and completing Sf 3102